Overview
The objective of this document is to outline the steps that are required to export raster products as geoTIFF (.tif) files from Marigold v.2.0.
Outputs from Marigold can be imported into GIS programs such as ArcGIS Pro, ArcMap, MapInfo, and QGIS.
Raster Export Format
Currently, geoTIFF is the only format available for exporting raster-based derived products from Marigold 2.0. Future updates to Marigold plan to include support for establishing a WMTS connection to a GIS and for directly linking Marigold to ESRI’s ArcMap environment.
GeoTIFF is an industry standard raster image format that is compatible with most external GIS environments.
Limitations
The maximum size for any one geoTIFF export (.zip file) is 10GB. This limit exists regardless of the image type (e.g., a single band mineral index or a 3-band RGB). It is advisable to test exporting of an RGB over your AOI if you suspect you may be approaching this limit.
The second limitation for geoTIFF export is the number of products that can be exported at one time. In practice, a maximum of 5 derived products can be exported concurrently, though multi-band products may lower this limit.
GeoTIFF Export Steps
Step 1: Finalize processing on your products in Marigold
Ensure that the product is visualized to your liking. If not, adjust the appearance settings to apply your chosen color table and preferred thresholding and contrast stretching for each of the derived products that you plan to export. The exported product will reflect these settings.
Step 2: Determine your export boundaries
The extent of your export can be defined in two ways, 1) using the current viewport of the Marigold browser, and 2) using a specified AOI defined by a vector, such as an uploaded geoJSON.
Current Viewport
The default setting is to use the extent of the viewport as your export bounds. You can zoom and pan within the viewport to your desired bounds. In the example below, the size of the export will be the extent of the data that is currently viewable in Marigold, as is shown here in Figure 1. In this example a wide area around the deposit itself is selected.
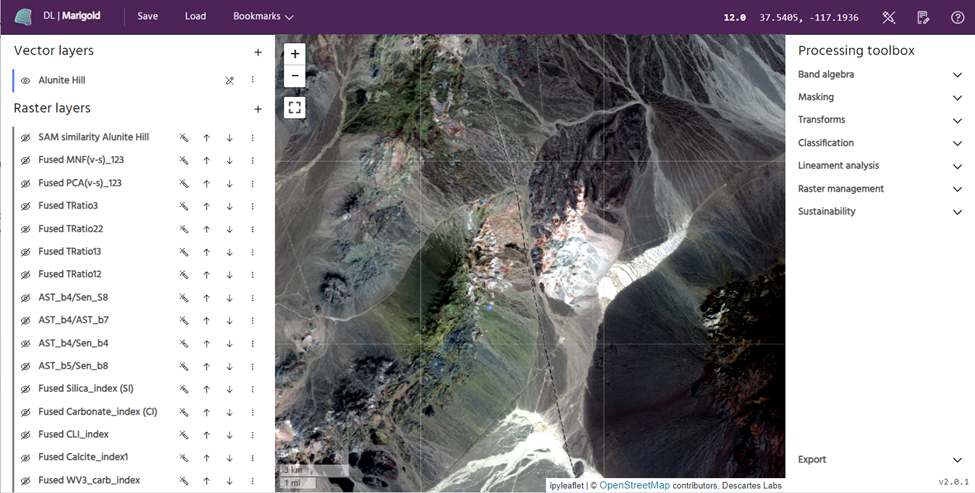
Figure 1: The extent of a derived product raster export will be the area of the image shown here in the viewport.
Vector AOI Selection
Alternatively, you can select a specific outline or AOI to highlight a prospective area. Available polygon vectors within your project will be listed in the dropdown menu. For example, in Figure 2, the extent of the export can be specified as only that outlined by the vector layer ‘Cuprite-East-AOI”

Figure 2: Another way to adjust the area of extent is to select a specific vector outline (geoJSON) over which the data will be exported. In this example, the vector would be chosen as the extent definition.
- See Tips and Tricks at the bottom of this article for additional advice on defining your export window to fit your AOI
Step 3: Select products and export
Navigate to the export dialog by selecting "Export" at the bottom of the right hand processing toolbox, then select "Geotiff".
Within the export window that opens (Figure 3), select your chosen AOI export method as discussed in Step 2 above (viewport or a vector AOI).
Next, select the Render Type, which can be either “As visualized” or “Raw values”. Exporting “As Visualized” will result in a three band RGB image with the values of each pixel representing the precise RGB color values that correspond to the appearance of the layer in Marigold. Exporting as “Raw Values” produces an image where the value of each pixel corresponds to the underlying data, either the band reflectance value or the result of a calculation. This method will not contain the thresholding settings applied in Marigold and in turn will require manipulation in the user’s GIS program to improve visualization of the data.
Finally, select the checkbox next to the product or products you would like to export, being mindful of the five product limit. As noted above, each product will be exported as an individual .zip file and a limit of five products can be exported at one time. Click on Export GeoTIFF button at the bottom right of the dialog window. This will start the export process.

Figure 3: The Geotiff export dialog window in Marigold v.2. In this example, a particular AOI is selected here (via the drop down menu) and 5 different products are selected for export at the same time. 'As visualized' is selected as the render type to produce images identical to those seen in Marigold.
Step 4: Downloading and managing exports
When complete, the geoTIFFs can be downloaded and managed by using the Export status dialog window. Select “Check export status” under the Export dropdown menu to view the status of the each exports (Figure 4). Click the download link to begin downloading a .zip file containing your export into your browser's default location.
Exported files can be manually deleted from this dialog window to reduce clutter once downloading is complete. It is advisable to rename each downloaded .zip file with any important notes or settings (e.g., AOI used, as visualized, etc.) in order to avoid confusion with similar file names.
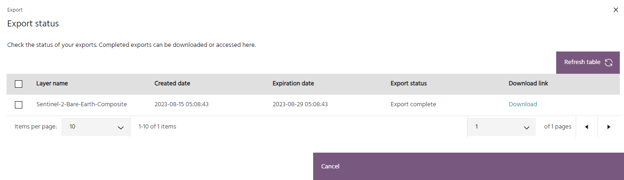
Figure 4: The Export Status dialog window to manage GeoTIFF exports. Each export can be downloaded from this window, then removed when exporting is complete.
Step 5: Working with the GeoTIFF export in your GIS
Unzip each file to a folder of the same name. Marigold uses a tiling process for to improve speed and file size and within each folder, you will see a number of .tif files and a single .vrt file that is the key to how all the tiles are combined into a single image in the GIS. Load this .vrt file into your GIS to visualize your export results and continue your analysis. All exported files will be in the WGS84 latitude and longitude coordinate system (EPSG:4326).
This process identified the fundamental steps of downloading GeoTIFF files in Marigold.
Don’t hesitate to reach out to us if you have any questions at support@descarteslabs.com
Tips and tricks
- There is no gain or loss in spatial resolution related to the size of the viewport window, that is related to the resolution of the underlying dataset. However, larger areas will take longer to export and may approach the file size limits so it is best to select only the area you are interested in.
- If your AOI is uniquely shaped, try adjusting the shape of your browser window (Figure 5). This can help to export particularly wide or skinny areas without including too much outside the AOI.
- Changing the zoom of your browser window can also affect the size of the viewport window to modify your export extent.
- To get the same output each time, bookmark your view location or use a vector to determine your AOI output.
- Use combined and overlapping vectors to create exports that overlap and fully cover your AOI without exceeding file size limits.
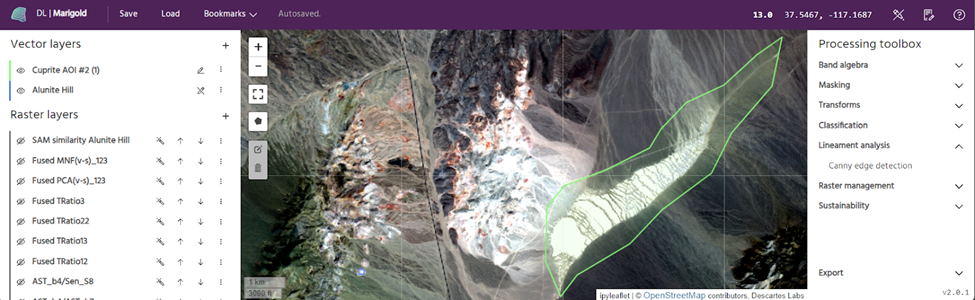
Figure 5: An example of the use of a vector file (geoJSON) used to highlight an AOI, and an adjustment of the top and bottom position of the Marigold browser window to frame the shape and area of the viewport to fit the target.